Enforcing rules at scale with pre-commit-dbt

Editor's note — since the creation of this post, the package pre-commit-dbt's ownership has moved to another team and it has been renamed to dbt-checkpoint. A redirect has been set up, meaning that the code example below will still work. It is also possible to replace repo: https://github.com/offbi/pre-commit-dbt with repo: https://github.com/dbt-checkpoint/dbt-checkpoint in your .pre-commit-config.yaml file.
At dbt Labs, we have best practices we like to follow for the development of dbt projects. One of them, for example, is that all models should have at least unique and not_null tests on their primary key. But how can we enforce rules like this?
That question becomes difficult to answer in large dbt projects. Developers might not follow the same conventions. They might not be aware of past decisions, and reviewing pull requests in git can become more complex. When dbt projects have hundreds of models, it's hard to know which models do not have any tests defined and aren't enforcing your conventions.
One potential solution is to leverage the open-source package pre-commit-dbt, created by dbt community members, that can be used to automatically run tests before committing files to git or as part of CI steps. In this article, I'll walk you through the strategy I use to implement this package and enforce rules at scale.
What are pre-commit and pre-commit-dbt?
pre-commit is a framework that can be used to automatically run tests before committing files to git, leveraging git hooks.
In our case, we will use the ability of pre-commit to run automated tests but I will also explain below how to use it with the flags --all-files or --files to leverage the same tests on a predefined list of dbt models.
On the other hand, pre-commit-dbt defines dbt specific tests and actions (called hooks) for the pre-commit framework.
There are currently over 20 tests that have been created but here 2 examples that we will leverage:
check-model-has-tests: Check the model has a number of tests.check-model-has-properties-file: Check the model has a properties file (also called schema file).
Implementing pre-commit-dbt & adding tests
Let’s take the example of a project with more than 300 models. Dozens of people have committed to the project, a PR review process is in place, but sometimes, with multiple models in the same PR, tracking if tests have been added or not is not easy and we know that not all models are tested today even if they should.
To remediate this let’s follow those 4 steps:
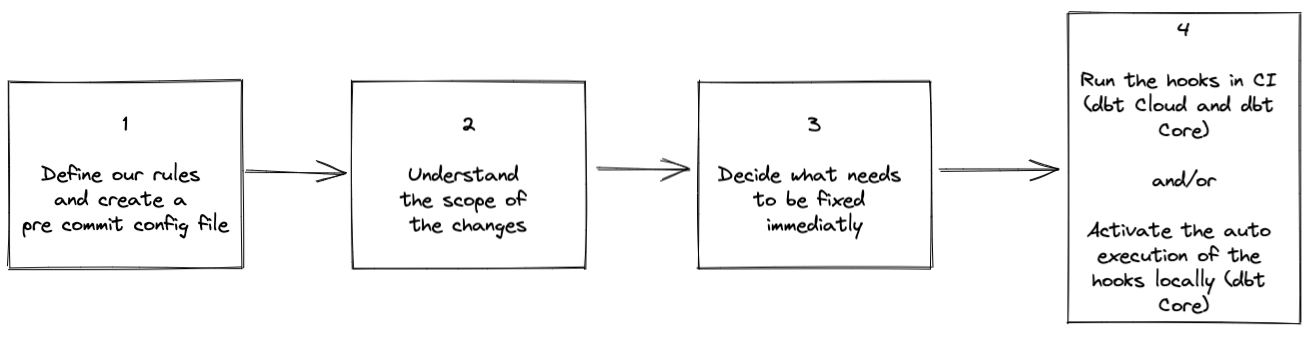
1. Define our rules and create a pre-commit config file
pre-commit-dbt provides a range of tests that can be run on the models of our dbt project. In the case of a project which has existed for some time and which might not be entirely following best practices, I would recommend selecting a small subset of tests, fixing the project and adding more tests later on.
In our example, let’s just start by saying that we want:
- all our models to have been added to a YAML file
- all our models to include some tests
To configure pre-commit, we have to create a file called .pre-commit-config.yaml at the root of our dbt project and add the following content:
repos:
- repo: https://github.com/offbi/pre-commit-dbt
  rev: v1.0.0
  hooks:
  - id: dbt-docs-generate
  - id: check-model-has-properties-file
    name: Check that all models are listed in a YAML file
    files: ^models/
  - id: check-model-has-tests
    name: Check that all models have tests
    files: ^models/
A few notes about this file:
- We start with a dbt-docs-generate to ensure that the command
dbt docs generateis run before checking our models. This is required because pre-commit-dbt reads from the artifactscatalog.jsonandmanifest.jsonand those files can be generated by generating the documentation - The
filesargument is a regular expression.^models/is going to apply the test to all our models whose path starts withmodels, i.e. all the models of our project. If we wanted to run the test only for the models in the mart folder, we could write^models/mart. There are a few handy tools online to define and test regular expressions; one of them is https://regex101.com/ - We could also provide values for the parameter
excludeif we wanted to exclude specific files or folders - We could have added a parameter to the hook
check-model-has-teststo mention how many tests each model is supposed to have (see here)
Now that we have defined our configuration file, the next step will depend on whether we are using dbt via dbt Cloud or dbt Core via the CLI.
If we are using dbt Cloud, let’s jump to step 4, where we will set up pre-commit-dbt as part of the CI process, otherwise, with dbt Core we can go to step 2.
2. Understand the scope of the changes required
With our configuration file created, we can now set up our computer to do some checks locally.
Activating a Python virtual environment
If we are using dbt in a Python virtual environment, let’s activate this environment. If not, we should really create a Python virtual environment (more info here) and activate it before installing pre-commit.
We could technically skip this step but might then end up getting issues on our computer with different Python packages conflicting with each other.
Installing and running pre-commit
Once in the Python virtual environment, installing pre-commit is as straightforward as running python -m pip install pre-commit.
A normal next step after installing pre-commit is to run a pre-commit install to install the git hooks and run tests automatically, but in our case, let’s wait a bit! We will cover this in step 4.
Instead, we can do a pre-commit run --all-files, which will run all the tests defined in our configuration file on all the files in our dbt project.
In my case, I can see that my model called customers.sql has not been added to any YAML file and has no test defined.
In the case of a large project, the number of issues might be much bigger. If we use zsh as our shell, wildcard expansion can be used and we could run pre-commit run --files models/mart/* if we wanted to run all the checks only in the models stored under mart.
3. Decide what needs to be fixed immediately
Once we have the list of models that either don’t exist in the YAML files or that don’t have any test defined, we can decide if we want to fix all of them at once or not.
What we will see in step 4 is that even if not all models are fixed at once, the CI step and the git hooks can lead to better project hygiene, forcing every model that is being modified to be tested.
In my example above, with just one model to fix, it is easy to create a PR with the changes, but if hundreds of models show up, you might decide to only fix the most important ones at first (your mart for example) and fix the other ones later on.
4. Make it part of the periodic checks
The last step of our flow is to make those pre-commit checks part of the day-to-day activities, running on the dbt models that are newly created or modified. That way, even if we don’t fix all our models at once, if they get modified at some points, tests will need to be added for the PR to be merged.
Adding periodic pre-commit checks can be done in 2 different ways, through CI (Continuous Integration) actions, or as git hooks when running dbt locally
a) Adding pre-commit-dbt to the CI flow (works for dbt Cloud and dbt Core users)
The example below will assume GitHub actions as the CI engine but similar behavior could be achieved in any other CI tool.
As described before, we need to run a dbt docs generate in order to create updated JSON artifacts used in the pre-commit hooks.
For that reason, we will need our CI step to execute this command, which will require setting up a profiles.yml file providing dbt the information to connect to the data warehouse. Profiles files will be different for each data warehouse (example here).
In our case, let’s create a file called profiles.yml at the root of our dbt project, with the following information:
jaffle_shop:
target: ci
outputs:
ci:
type: postgres
host: <your_host>
user: <user>
password: "{{ env_var('DB_PASSWORD') }}"
port: 5432
dbname: <database>
schema: ci
threads: 4
We don’t want to save the password of our user in a clear text file. For that purpose, we use the ability to read it from an environment variable. The next step is to save the value of our password as a secret in GitHub. In our GitHub repository, under Settings > Security > Secrets > Action, let’s create a secret called DB_PASSWORD to store our sensitive password.
Finally, we can create a new YAML file to define our GitHub action. e.g. .github/workflows/pre_commit_checks.yml The name is not important but this file must be saved under the folders .github/workflows/ (create those if they don’t exist yet)
name: pre-commit-check

on:
  pull_request:
    branches:
      - main

jobs:
  pre-commit-pip:
    name: Install pre-commit via pip
    runs-on: ${{ matrix.os }}
    strategy:
      fail-fast: false
      matrix:
        os: ['ubuntu-latest']
        python-version: [3.8]

    # Set environment variables used throughout workflow
    env:
      DBT_PROFILES_DIR: .
      DB_PASSWORD: ${{ secrets.DB_PASSWORD }}

    steps:

      - name: Checkout branch
        uses: actions/checkout@v3

    # Using bash and pip to install dbt and pre-commit
    # Update the dbt installation command to include the adapter you need
      - name: Install dbt and pre-commit
        shell: bash -l {0}
        run: |
          python -m pip install dbt-postgres pre-commit

    # This action will output all the files that are being created and modified in our PR
      - name: Get changed files
        id: get_file_changes
        uses: trilom/file-changes-action@v1.2.4
        with:
          output: ' '

    # Transforming the output of get_file_changes to a string we can use for our next step
    # We want to take in account both new files and files that have been modified
      - name: Get changed .sql files in /models to lint
        id: get_files_to_lint
        shell: bash -l {0}
        run: |
          # Set the command in the $() brackets as an output to use in later steps
          echo "::set-output name=files::$(
          # Issue where grep regular expressions don't work as expected on the
          # Github Actions shell, check dbt/models/ folder
          echo \
          $(echo ${{ steps.get_file_changes.outputs.files_modified }} |
          tr -s ' ' '\n' |
          grep -E '^models.*[.]sql$' |
          tr -s '\n' ' ') \
          $(echo ${{ steps.get_file_changes.outputs.files_added }} |
          tr -s ' ' '\n' |
          grep -E '^models.*[.]sql$' |
          tr -s '\n' ' ')
          )"

    # Finally run pre-commit
      - name: Run pre-commit
        shell: bash -l {0}
        run: |
          pre-commit run --files ${{ steps.get_files_to_lint.outputs.files }}
The code is documented and should be self-explanatory, in a nutshell, we perform the following steps:
- Mention that this action and all the steps should be run for every PR to main
- Retrieve the code from our PR
- Install dbt and pre-commit
- Identify the files modified in our PR and format them as a list of models separated by spaces
- Execute a
pre-commit run --fileson the models we just modified or created
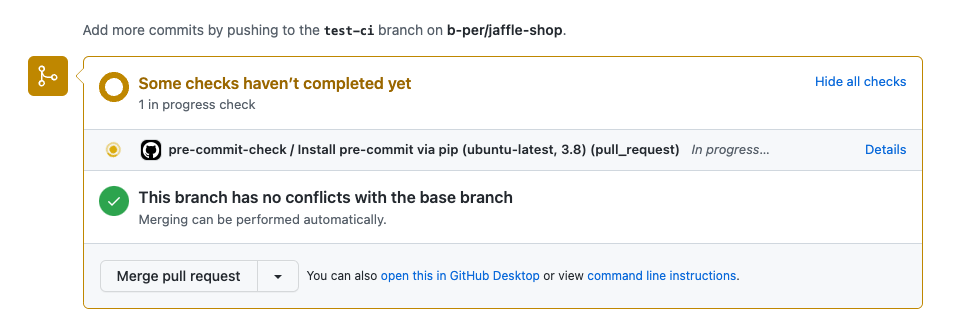
Once we push those changes to our repo to a custom branch and create a PR to main, we see the following:
The GitHub action is running:
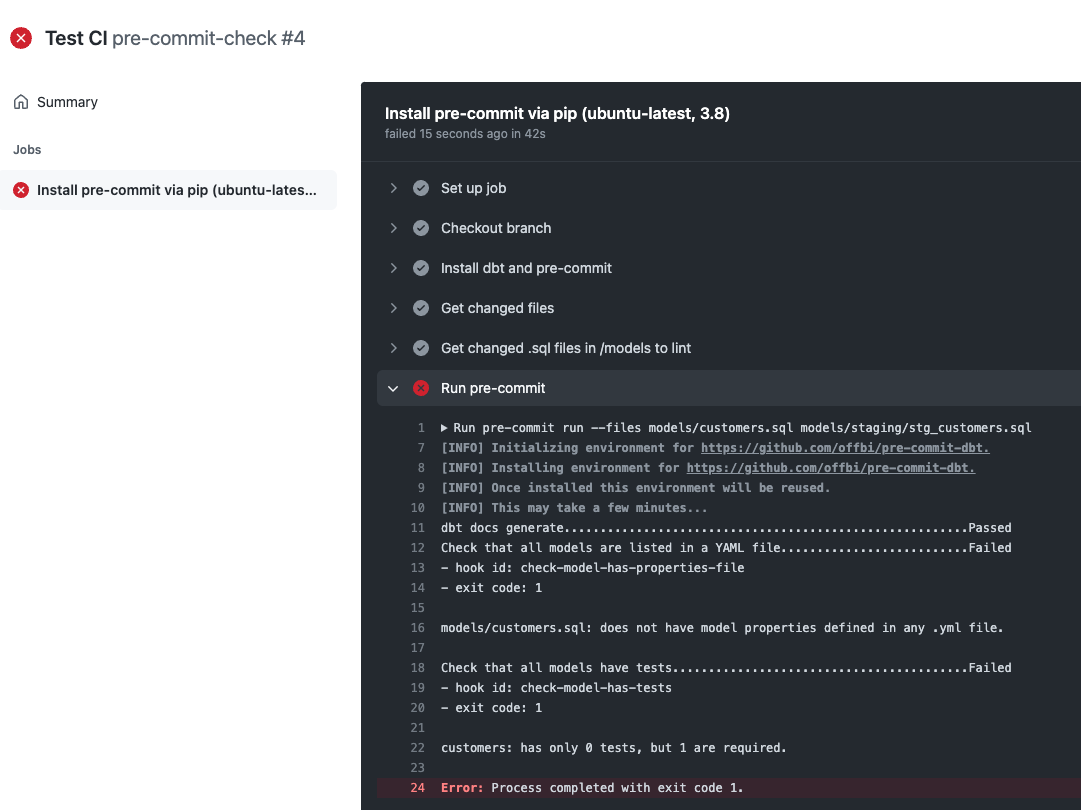
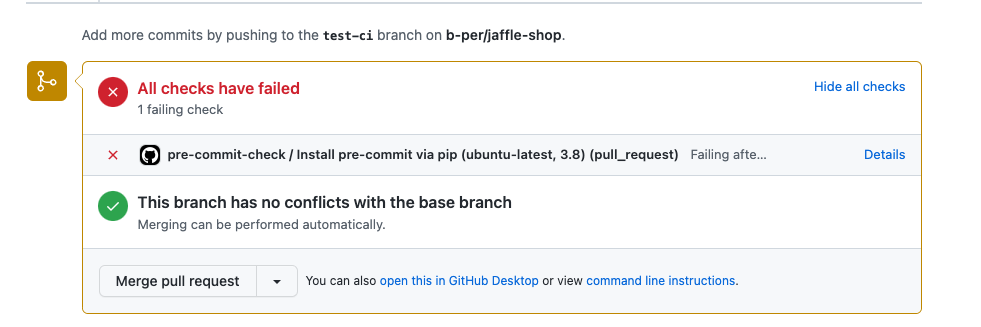
The step fails because I missed some tests and it tells me what model is failing:
The result of the check is also shown in the PR directly:
With that information, I could now go back to dbt, document my model customers and push those new changes to my repo for another check to be performed.
We could set up rules that prevent any change to be merged if the GitHub action fails. Alternatively, this action step can be defined as merely informational.
b) Installing the pre-commit git hooks (for dbt Core users)
If we develop locally with the dbt Core CLI, we could also execute pre-commit install to install the git hooks. What it means then is that every time we want to commit code in git, the pre-commit hooks will run and will prevent us from committing if any step fails.
If we want to commit code without performing all the steps of the pre-hook we could use the environment variable SKIP or the git flag --no-verify as described in the documentation. (e.g. we might want to skip the auto dbt docs generate locally to prevent it from running at every commit and rely on running it manually from time to time)
And if we install the hooks and realize that we don’t want them anymore, we just need to delete the folder .git/hooks/
c) So tests in CI, or git hooks locally?
Those two configurations are not exclusive but complementary.
- Having the hooks set up locally ensures that all our models follow our conventions even before pushing them to our repo, ensuring that the CI step will pass correctly.
- And the GitHub action as CI test is a great safeguard for people using the dbt Cloud IDE or local developers who either have not installed the hooks or tried to push changes with the
--no-verifyflag

Taking this solution further
We now have a process to ensure that the rules we are setting around testing required in our dbt models are enforced through automated steps.
What next? Going back to the diagram at the beginning of this post, we can now think of new rules we want to automate and modify our pre-commit file and GitHub actions to increase the quality of our dbt project.
It is important though to keep in mind a good balance between setting enough rules and automation to ensure a project of good quality and setting too many of them, taking time from more value-added work and potentially slowing down the overall analytics development process.

- We could for example add SQLFluff as a SQL Linter to show us what SQL code is not following the rules that we have defined
- Or we could add more pre-commit-dbt checks like check-model-name-contract to make sure that all our model names are following the correct naming convention
- Or we could add a check on our YAML files to verify if they are all indented correctly
If you have any questions about this process or want to share how you are using pre-commit and CI to increase the quality of your dbt project, feel free to jump in dbt Slack and post in #i-made-this or #dbt-deployment-and-orchestration !
Comments