Get started with Continuous Integration tests
Introduction
By validating your code before it goes into production, you don't need to spend your afternoon fielding messages from people whose reports are suddenly broken.
A solid CI setup is critical to preventing avoidable downtime and broken trust. dbt Cloud uses sensible defaults to get you up and running in a performant and cost-effective way in minimal time.
After that, there's time to get fancy, but let's walk before we run.
In this guide, we're going to add a CI environment, where proposed changes can be validated in the context of the entire project without impacting production systems. We will use a single set of deployment credentials (like the Prod environment), but models are built in a separate location to avoid impacting others (like the Dev environment).
Your git flow will look like this:
 git flow diagram
Prerequisites
As part of your initial dbt Cloud setup, you should already have Development and Production environments configured. Let's recap what each does:
- Your Development environment powers the IDE. Each user has individual credentials, and builds into an individual dev schema. Nothing you do here impacts any of your colleagues.
- Your Production environment brings the canonical version of your project to life for downstream consumers. There is a single set of deployment credentials, and everything is built into your production schema(s).
Create a new CI environment
See Create a new environment. The environment should be called CI. Just like your existing Production environment, it will be a Deployment-type environment.
When setting a Schema in the Deployment Credentials area, remember that dbt Cloud will automatically generate a custom schema name for each PR to ensure that they don't interfere with your deployed models. This means you can safely set the same Schema name as your Production job.
1. Double-check your Production environment is identified
Go into your existing Production environment, and ensure that the Set as Production environment checkbox is set. It'll make things easier later.
2. Create a new job in the CI environment
Use the Continuous Integration Job template, and call the job CI Check.
In the Execution Settings, your command will be preset to dbt build --select state:modified+. Let's break this down:
dbt buildruns all nodes (seeds, models, snapshots, tests) at once in DAG order. If something fails, nodes that depend on it will be skipped.- The
state:modified+selector means that only modified nodes and their children will be run ("Slim CI"). In addition to not wasting time building and testing nodes that weren't changed in the first place, this significantly reduces compute costs.
To be able to find modified nodes, dbt needs to have something to compare against. dbt Cloud uses the last successful run of any job in your Production environment as its comparison state. As long as you identified your Production environment in Step 2, you won't need to touch this. If you didn't, pick the right environment from the dropdown.
3. Test your process
That's it! There are other steps you can take to be even more confident in your work, such as validating your structure follows best practices and linting your code. For more information, refer to Get started with Continuous Integration tests.
To test your new flow, create a new branch in the dbt Cloud IDE then add a new file or modify an existing one. Commit it, then create a new Pull Request (not a draft). Within a few seconds, you’ll see a new check appear in your git provider.
Things to keep in mind
- If you make a new commit while a CI run based on older code is in progress, it will be automatically canceled and replaced with the fresh code.
- An unlimited number of CI jobs can run at once. If 10 developers all commit code to different PRs at the same time, each person will get their own schema containing their changes. Once each PR is merged, dbt Cloud will drop that schema.
- CI jobs will never block a production run.
Enforce best practices with dbt project evaluator
dbt Project Evaluator is a package designed to identify deviations from best practices common to many dbt projects, including modeling, testing, documentation, structure and performance problems. For an introduction to the package, read its launch blog post.
1. Install the package
As with all packages, add a reference to dbt-labs/dbt_project_evaluator to your packages.yml file. See the dbt Package Hub for full installation instructions.
2. Define test severity with an environment variable
As noted in the documentation, tests in the package are set to warn severity by default.
To have these tests fail in CI, create a new environment called DBT_PROJECT_EVALUATOR_SEVERITY. Set the project-wide default to warn, and set it to error in the CI environment.
In your dbt_project.yml file, override the severity configuration:
tests:
dbt_project_evaluator:
    +severity: "{{ env_var('DBT_PROJECT_EVALUATOR_SEVERITY', 'warn') }}"
3. Update your CI commands
Because these tests should only run after the rest of your project has been built, your existing CI command will need to be updated to exclude the dbtproject_evaluator package. You will then add a second step which builds _only the package's models and tests.
Update your steps to:
dbt build --select state:modified+ --exclude package:dbt_project_evaluator
dbt build --select package:dbt_project_evaluator
4. Apply any customizations
Depending on the state of your project when you roll out the evaluator, you may need to skip some tests or allow exceptions for some areas. To do this, refer to the documentation on:
- disabling tests
- excluding groups of models from a specific test
- excluding packages or sources/models based on path
If you create a seed to exclude groups of models from a specific test, remember to disable the default seed and include dbt_project_evaluator_exceptions in your second dbt build command above.
Run linting checks with SQLFluff
By linting your project during CI, you can ensure that code styling standards are consistently enforced, without spending human time nitpicking comma placement.
The steps below create an action/pipeline which uses SQLFluff to scan your code and look for linting errors. If you don't already have SQLFluff rules defined, check out our recommended config file.
1. Create a YAML file to define your pipeline
The YAML files defined below are what tell your code hosting platform the steps to run. In this setup, you’re telling the platform to run a SQLFluff lint job every time a commit is pushed.
- GitHub
- GitLab
- Bitbucket
GitHub Actions are defined in the .github/workflows directory. To define the job for your action, add a new file named lint_on_push.yml under the workflows folder. Your final folder structure will look like this:
my_awesome_project
├── .github
│   ├── workflows
│   │   └── lint_on_push.yml
Key pieces:
on:defines when the pipeline is run. This workflow will run whenever code is pushed to any branch exceptmain. For other trigger options, check out GitHub’s docs.runs-on: ubuntu-latest- this defines the operating system we’re using to run the jobuses:- When the Ubuntu server is created, it is completely empty.checkoutandsetup-pythonare public GitHub Actions which enable the server to access the code in your repo, and set up Python correctly.run:- these steps are run at the command line, as though you typed them at a prompt yourself. This will install sqlfluff and lint the project. Be sure to set the correct--dialectfor your project.
For a full breakdown of the properties in a workflow file, see Understanding the workflow file on GitHub's website.
name: lint dbt project on push

on:
  push:
    branches-ignore:
      - 'main'

jobs:
  # this job runs SQLFluff with a specific set of rules
  # note the dialect is set to Snowflake, so make that specific to your setup
  # details on linter rules: https://docs.sqlfluff.com/en/stable/rules.html
  lint_project:
    name: Run SQLFluff linter
    runs-on: ubuntu-latest

    steps:
      - uses: "actions/checkout@v3"
      - uses: "actions/setup-python@v4"
        with:
          python-version: "3.9"
      - name: Install SQLFluff
        run: "python -m pip install sqlfluff"
      - name: Lint project
        run: "sqlfluff lint models --dialect snowflake"
Create a .gitlab-ci.yml file in your root directory to define the triggers for when to execute the script below. You’ll put the code below into this file.
my_awesome_project
├── dbt_project.yml
├── .gitlab-ci.yml
Key pieces:
image: python:3.9- this defines the virtual image we’re using to run the jobrules:- defines when the pipeline is run. This workflow will run whenever code is pushed to any branch exceptmain. For other rules, refer to GitLab’s documentation.script:- this is how we’re telling the GitLab runner to execute the Python script we defined above.
image: python:3.9

stages:
  - pre-build

# this job runs SQLFluff with a specific set of rules
# note the dialect is set to Snowflake, so make that specific to your setup
# details on linter rules: https://docs.sqlfluff.com/en/stable/rules.html
lint-project:
  stage: pre-build
  rules:
    - if: $CI_PIPELINE_SOURCE == "push" && $CI_COMMIT_BRANCH != 'main'
  script:
    - python -m pip install sqlfluff
    - sqlfluff lint models --dialect snowflake
Create a bitbucket-pipelines.yml file in your root directory to define the triggers for when to execute the script below. You’ll put the code below into this file.
my_awesome_project
├── bitbucket-pipelines.yml
├── dbt_project.yml
Key pieces:
image: python:3.11.1- this defines the virtual image we’re using to run the job'**':- this is used to filter when the pipeline runs. In this case we’re telling it to run on every push event, and you can see at line 12 we're creating a dummy pipeline formain. More information on filtering when a pipeline is run can be found in Bitbucket's documentationscript:- this is how we’re telling the Bitbucket runner to execute the Python script we defined above.
image: python:3.11.1


pipelines:
  branches:
    '**': # this sets a wildcard to run on every branch
      - step:
          name: Lint dbt project
          script:
            - python -m pip install sqlfluff==0.13.1
            - sqlfluff lint models --dialect snowflake --rules L019,L020,L021,L022

    'main': # override if your default branch doesn't run on a branch named "main"
      - step:
          script:
            - python --version
2. Commit and push your changes to make sure everything works
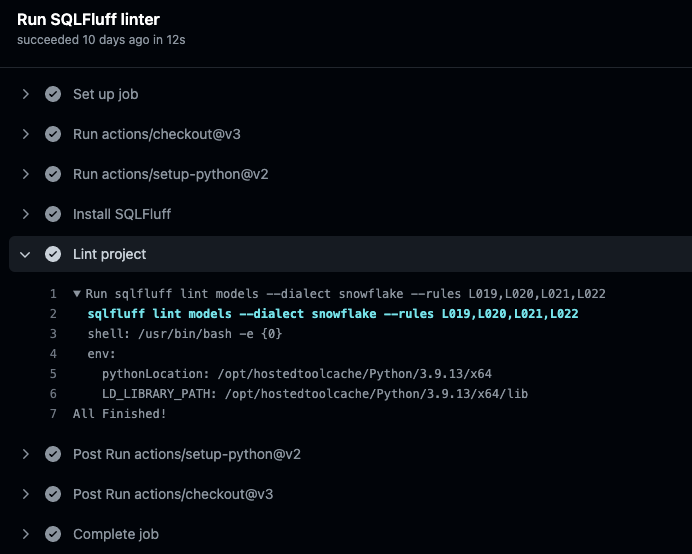
After you finish creating the YAML files, commit and push your code to trigger your pipeline for the first time. If everything goes well, you should see the pipeline in your code platform. When you click into the job you’ll get a log showing that SQLFluff was run. If your code failed linting you’ll get an error in the job with a description of what needs to be fixed. If everything passed the lint check, you’ll see a successful job run.
- GitHub
- GitLab
- Bitbucket
In your repository, click the Actions tab

Sample output from SQLFluff in the Run SQLFluff linter job:
In the menu option go to CI/CD > Pipelines

Sample output from SQLFluff in the Run SQLFluff linter job:

In the left menu pane, click on Pipelines

Sample output from SQLFluff in the Run SQLFluff linter job:

Advanced: Create a release train with additional environments
Large and complex enterprises sometimes require additional layers of validation before deployment. Learn how to add these checks with dbt Cloud.
This approach can increase release safety, but creates additional manual steps in the deployment process as well as a greater maintenance burden.
As such, it may slow down the time it takes to get new features into production.
The team at Sunrun maintained a SOX-compliant deployment in dbt while reducing the number of environments. Check out their Coalesce presentation to learn more.
In this section, we will add a new QA environment. New features will branch off from and be merged back into the associated qa branch, and a member of your team (the "Release Manager") will create a PR against main to be validated in the CI environment before going live.
The git flow will look like this:
 git flow diagram with an intermediary branch
Advanced prerequisites
- You have the Development, CI, and Production environments, as described in the Baseline setup.
1. Create a release branch in your git repo
As noted above, this branch will outlive any individual feature, and will be the base of all feature development for a period of time. Your team might choose to create a new branch for each sprint (qa/sprint-01, qa/sprint-02, etc), tie it to a version of your data product (qa/1.0, qa/1.1), or just have a single qa branch which remains active indefinitely.
2. Update your Development environment to use the qa branch
See Custom branch behavior. Setting qa as your custom branch ensures that the IDE creates new branches and PRs with the correct target, instead of using main.
 A demonstration of configuring a custom branch for an environment
3. Create a new QA environment
See Create a new environment. The environment should be called QA. Just like your existing Production and CI environments, it will be a Deployment-type environment.
Set its branch to qa as well.
4. Create a new job
Use the Continuous Integration Job template, and call the job QA Check.
In the Execution Settings, your command will be preset to dbt build --select state:modified+. Let's break this down:
dbt buildruns all nodes (seeds, models, snapshots, tests) at once in DAG order. If something fails, nodes that depend on it will be skipped.- The
state:modified+selector means that only modified nodes and their children will be run ("Slim CI"). In addition to not wasting time building and testing nodes that weren't changed in the first place, this significantly reduces compute costs.
To be able to find modified nodes, dbt needs to have something to compare against. Normally, we use the Production environment as the source of truth, but in this case there will be new code merged into qa long before it hits the main branch and Production environment. Because of this, we'll want to defer the Release environment to itself.
Optional: also add a compile-only job
dbt Cloud uses the last successful run of any job in that environment as its comparison state. If you have a lot of PRs in flight, the comparison state could switch around regularly.
Adding a regularly-scheduled job inside of the QA environment whose only command is dbt compile can regenerate a more stable manifest for comparison purposes.
5. Test your process
When the Release Manager is ready to cut a new release, they will manually open a PR from qa into main from their git provider (e.g. GitHub, GitLab, Azure DevOps). dbt Cloud will detect the new PR, at which point the existing check in the CI environment will trigger and run. When using the baseline configuration, it's possible to kick off the PR creation from inside of the dbt Cloud IDE. Under this paradigm, that button will create PRs targeting your QA branch instead.
To test your new flow, create a new branch in the dbt Cloud IDE then add a new file or modify an existing one. Commit it, then create a new Pull Request (not a draft) against your qa branch. You'll see the integration tests begin to run. Once they complete, manually create a PR against main, and within a few seconds you’ll see the tests run again but this time incorporating all changes from all code that hasn't been merged to main yet.